Professional Work (Aug 2021 - Jan 2023): Interplay Learning
Title: Simulation Designer
Category: VR/3D Simulation & Interactive State Machines
I designed and built immersive VR training simulations for HVAC diagnostics. The sims had to feel tactile, deliberate, and trustworthy — a technician learning to diagnose a real furnace should be able to trust that the simulation behaves like the real unit. All of the heavy interaction logic was built without runtime scripting, which meant Unity state machines, animation timelines, conditionals, tweens, and a lot of manual systems thinking carried the entire production.
My responsibilities covered simulation design & development, publishing polish, and QA — both for my own sims and for colleagues who asked during free cycles.
The Modules
Carrier Gas Furnace Setup
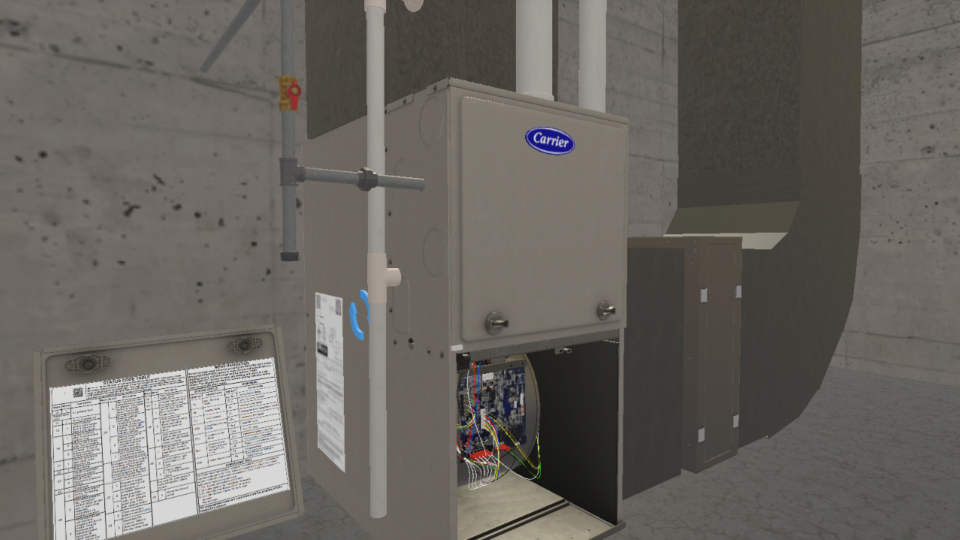 A comprehensive course covering setup and fault diagnosis of a Carrier furnace using NFC technology, control board LEDs, and the Service Tech App.
SPP Troubleshooting
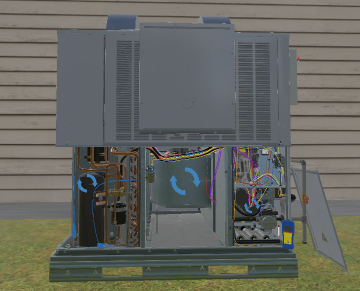 An intermediate, 22-SIM guided walkthrough for troubleshooting Gas SPP Products — faulty blowers, dirty flame sensors, bad ignitors, the full diagnostic spread.
What The Work Actually Looked Like
This was not “placing objects in a scene.” The day-to-day was:
- Building out the main Hero interactable and making every wire, button, panel, and interaction point behave correctly from client-provided reference. The client vetted content directly — for the Carrier furnace, that meant they provided explicit demonstrations of the exact LED controller menu transitions and button-press sequences. I was working from real hardware behavior, not loose descriptions.
- Reconstructing diagnostic logic from manuals and video references when the production pipeline did not provide enough engineering support or reusable tooling.
- Maintaining my own tracking infrastructure — Excel sheets, Notepad logs, scenario branch notes, bug lists — because the existing tools did not organize the production burden for me.
- Recording and importing my own object sounds when reused stock audio made the simulation feel fake.
- Writing local Unity scripts to debug hypotheses or validate behavior, then rebuilding the final result without code inside the approved state system.
- Standardizing procedure-guide language. There was no company-wide convention for how procedure steps should read. I developed my own pattern —
(Object: Action) Misc.— and applied it across every sim I built. The client responded well to the clarity. Outside of my sims, nothing was standardized.
The Hero Asset: Carrier Infinity 96
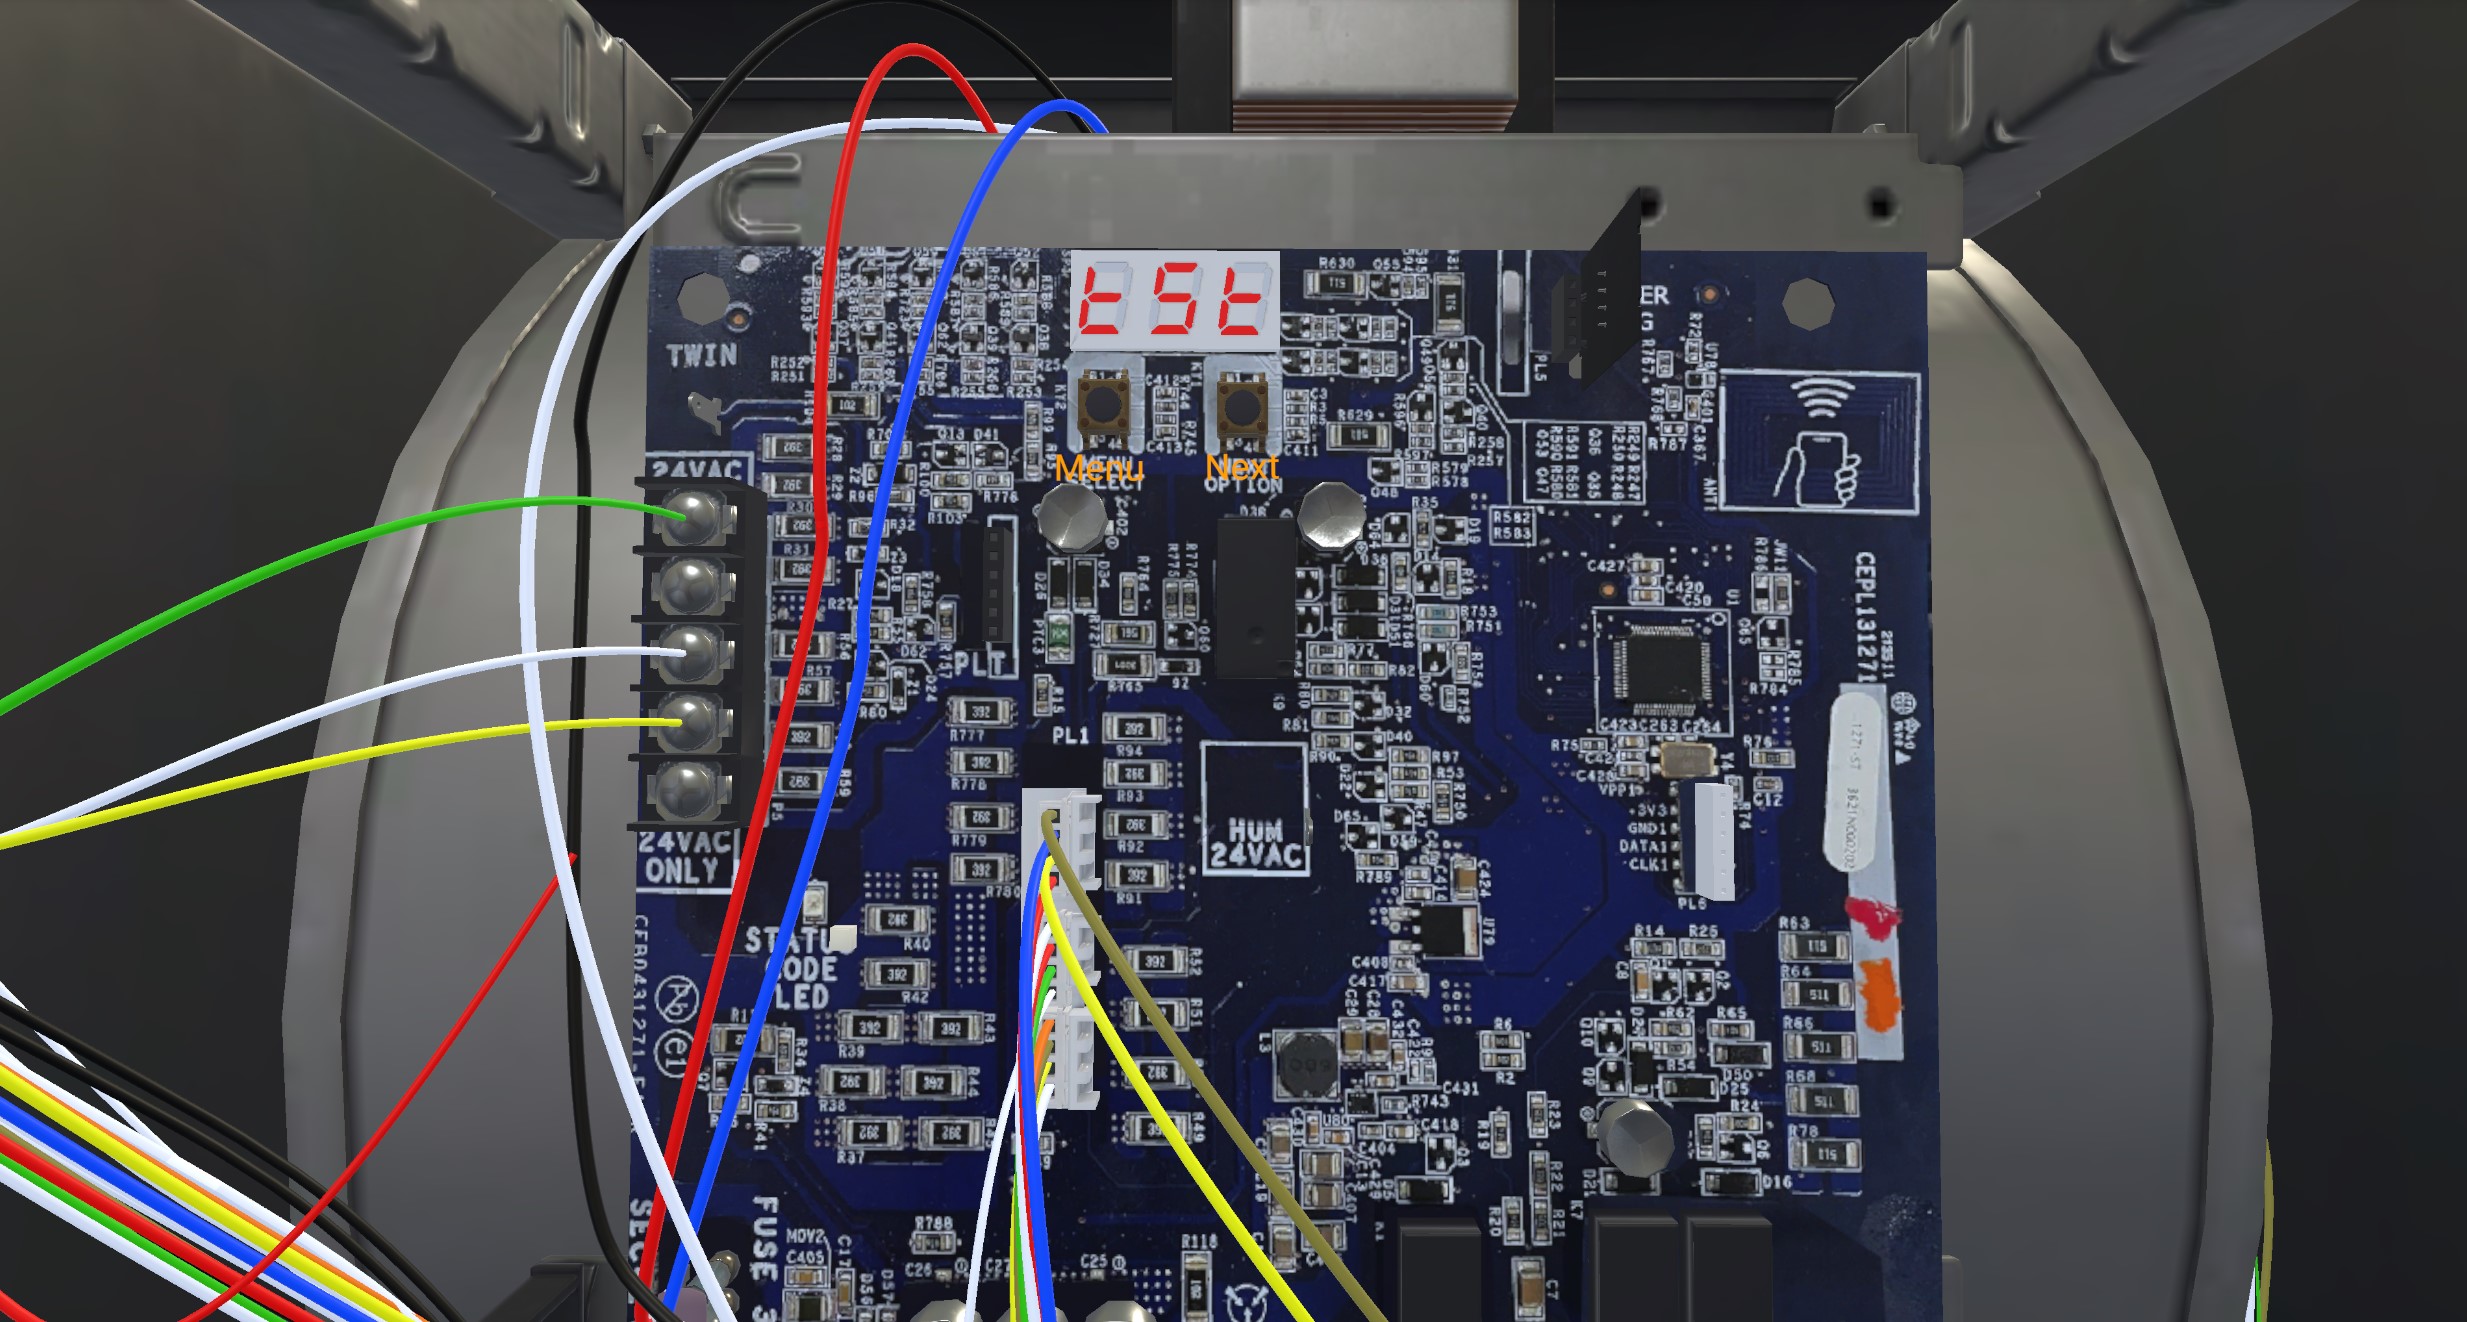
The most complex piece I built was the LED menu board for the Carrier furnace (Infinity 96 Gas Furnace 59TN6).
The Hero Asset is a non-functioning 3D model with discrete parts, streamed in at runtime via AWS. Users had to authenticate through the platform for the asset to load. Submitting a build meant compiling, uploading to an AWS-based publishing platform, then linking the build to the learning management system’s course. Procedure guide content, build registration, LMS course linking — all of it went through that pipeline.
Versioning was cache-based: download, upload, or delete builds from the publishing system. No proper version control. Tracking changes across iterations was a discipline problem I solved with my own spreadsheets and notes.
The Hero Asset had to survive real interaction pressure:
- Power on and off correctly
- Navigate through the real menu states
- Present correct maintenance and troubleshooting readouts
- Branch by scenario
- Support timing-based component tests
- Blink and settle on the right diagnostics without script-driven shortcuts
The LED was not text. It was three authored display sections made out of individual segments, with each usable letter and number existing as a reusable state.


The theoretical permutation space — every alpha-numeric combination across three 8-segment displays — works out to roughly 36^24. In practice, I reduced this to only the characters the manual actually required per position. The work was deducing the minimal necessary set and authoring segment-level states for just those characters. The decimal point indicator was a simple sphere GameObject with a red emissive material.
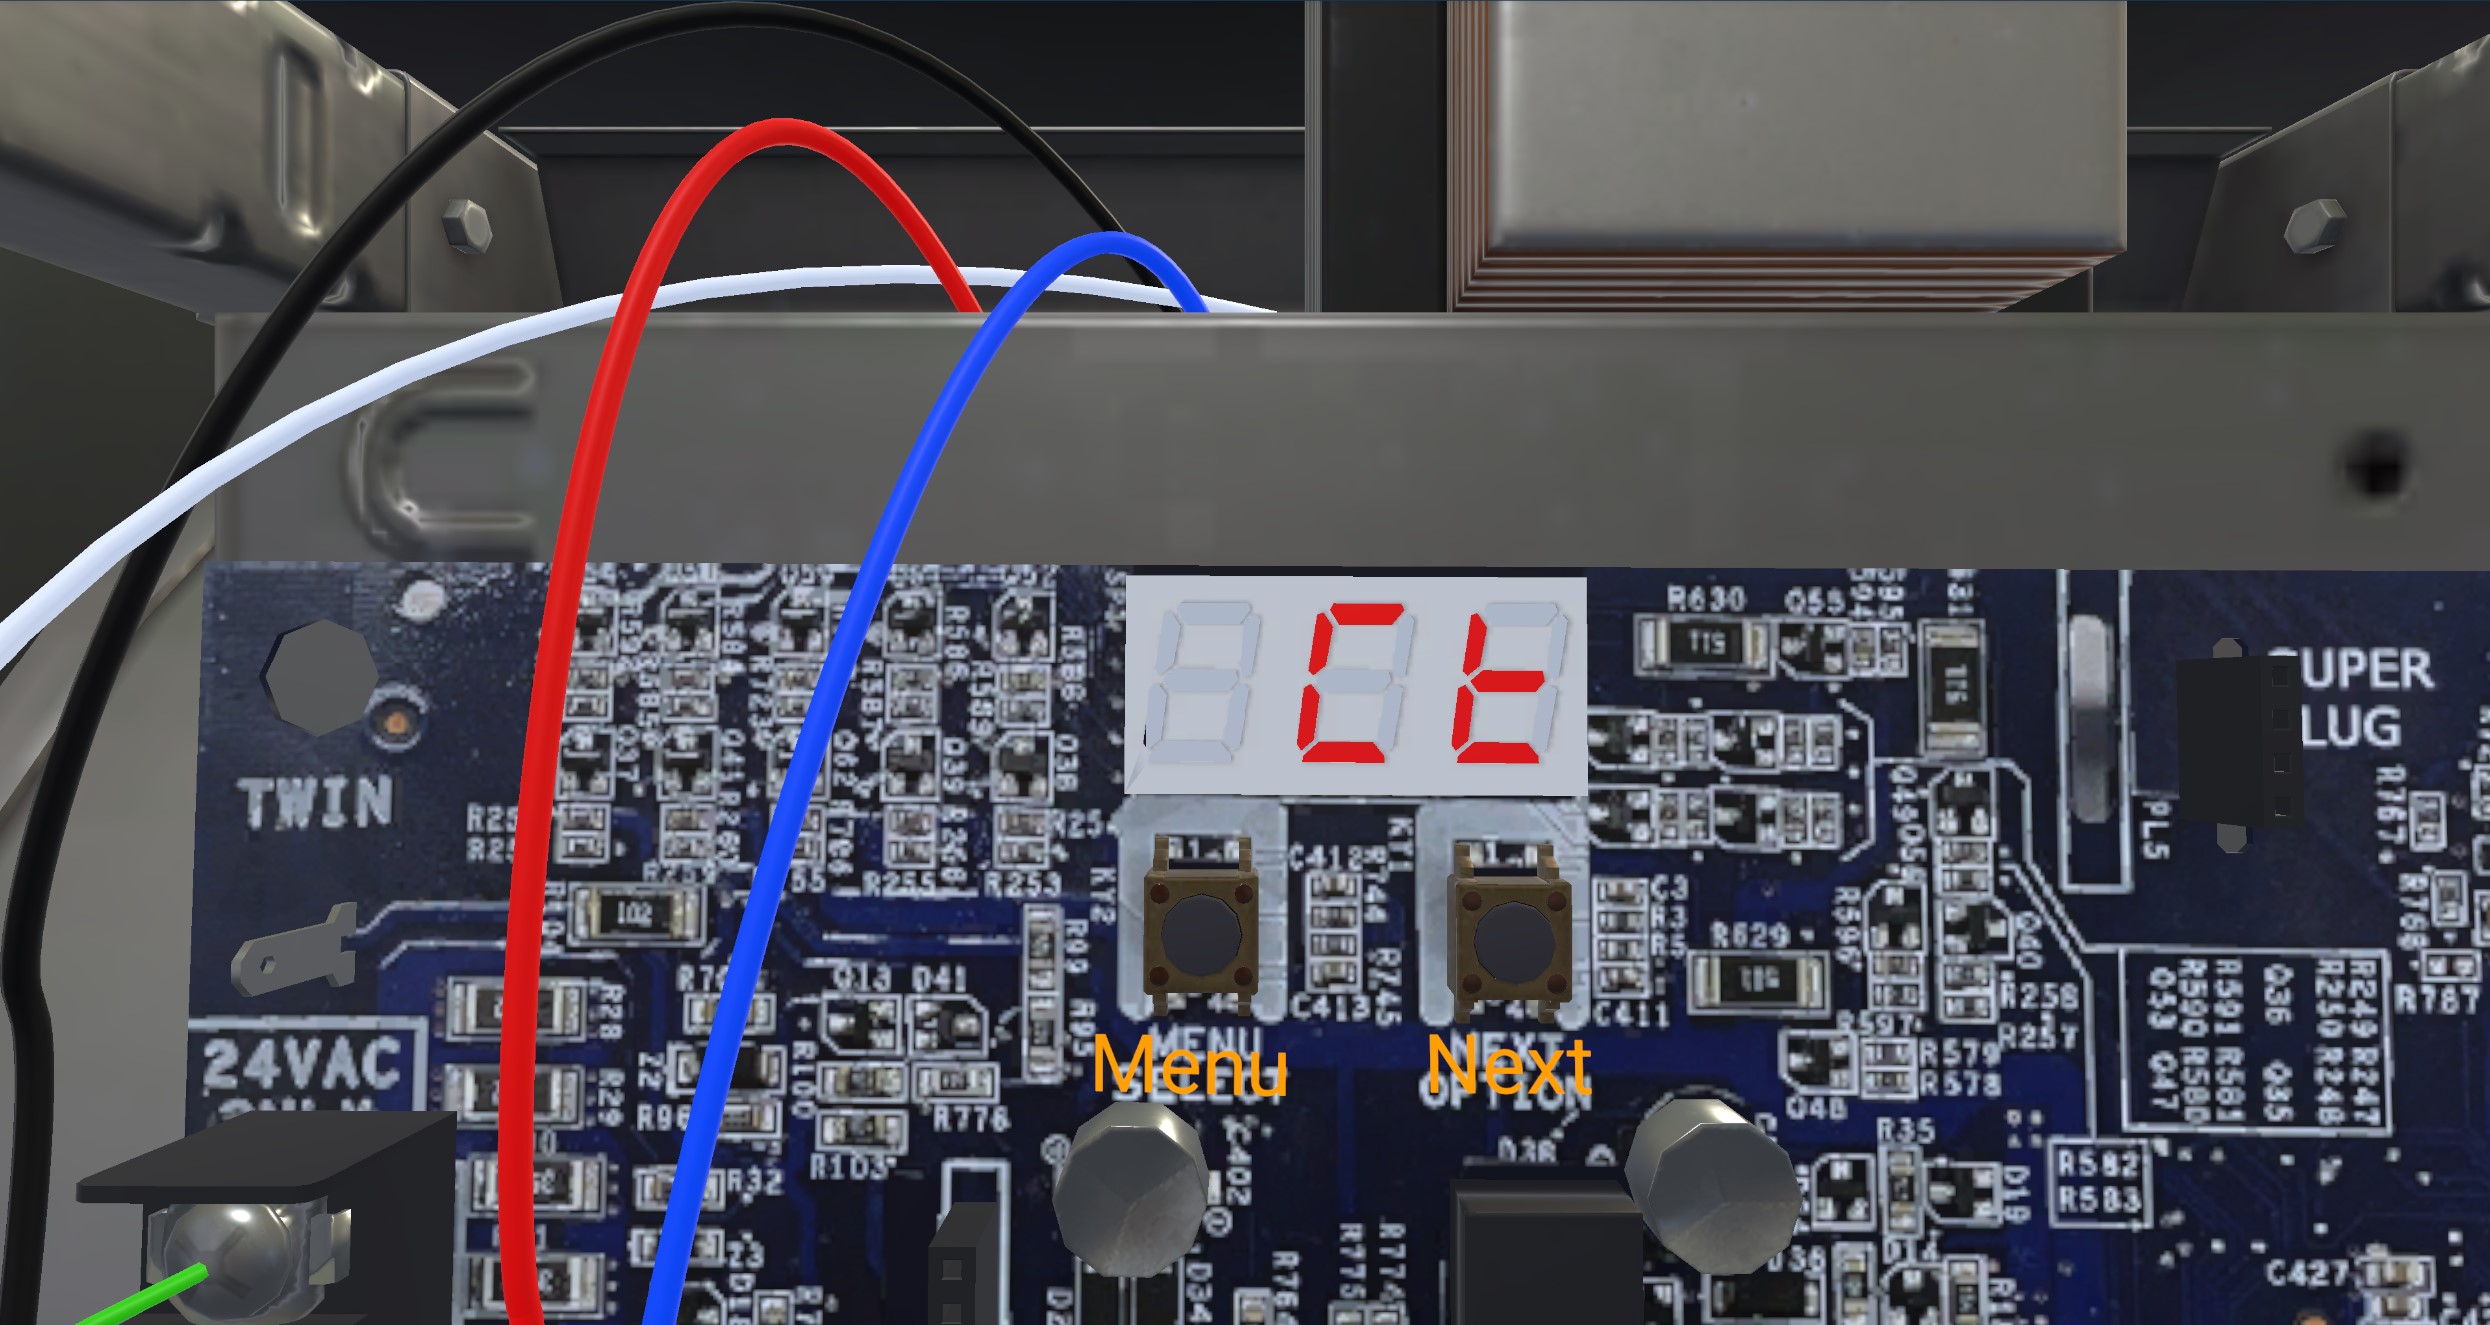
What idL Actually Meant
Creating a status code like idL was state choreography, not text rendering:
- Define the active segment pattern for
ion the left display. - Define the active segment pattern for
don the middle display. - Define the active segment pattern for
Lon the right display. - Save each as its own state in the local digit controller.
- Create a master
idLstate in the main LED controller. - Route the left, middle, and right displays into those authored letter states.
- Hook the result into the surrounding menu navigation so the power switch, camera focus, and button flow could actually reach it.
Case-sensitive. Menu-sensitive. Scenario-sensitive. Not a SetText() call.
The Ghost Asset: Blinking Without A Timer
Several of us requested a reusable timer script. We did not get one. So for component-test waits, flashing errors, and “turn on / turn off after 10 seconds” logic, I had to improvise.
The constraint: the Hero Asset had a GUID. Removing any part of the asset would cause that part to disappear from the scene — or sometimes break the entire reference chain. I could not just strip out the LEDs and repurpose them.
My solution was to create a ghost asset — a full duplicate of the Hero Asset that retained all of its structure and GUID references intact, but with every material disabled so it was completely invisible. When the LED needed to blink, the ghost asset’s corresponding GameObject would toggle active. The blink was literally the invisible clone’s LED cycling gameObject.SetActive() on and off in sequence, driving the visual through the state machine’s sub-state playback.
This let me fake timing and flash behavior for patterns like 3.14 or diagnostic blink counts, then land on a final stable result. With normal coding, this would have been a couple of days. In the no-code production setup, the permutation tree and blink logic alone took about a week.
Scenario Branching
The Carrier troubleshooting work was not one clean loop. It sprawled into branching failure cases:
- Faulty Transformer
- Low Voltage Short
- Temp Rise Out Of Range
- Faulty Blower Motor
- Dirty Flame Sensor
- Bad Ignitor
- Pressure Switch Hose Blocker
- Bad Gas Valve
- Bad Control Board
- Compressor No Pump
Each branch carried its own procedure-guide cards, interaction tool states, replacement tweens, camera requirements, highlight behavior, and return-to-normal logic. If the state graph needed to wait 10 seconds and check whether something turned off, I had to create the faulty state that would hold it on, hold it off, or force the correct transition.
Procedure Guide Design
Procedure guides stretched to 50+ steps. Grammar and user experience mattered as much as the state logic. The source text was often awkward:
Before: Flip off the Switch / Turn off the Switch
After: Light Switch: Off / Turn off the light switch.
The (Object: Action) pattern gave every step a scannable, consistent structure. A technician in VR should not have to parse ambiguous verbs while wearing a headset.
VR QA Standards
My QA checklist for shipping a sim:
- Do all clipboard actions proceed bottom-up?
- Are service labels explicitly mentioning the sim’s use case?
- Are VR inspectors oriented to avoid neck strain?
- Are fault images on the NFC app rendering correctly (not blank)?
- Are phone images correctly colored (not default blue)?
- Are interaction hitboxes responsive without requiring multiple attempts?
- Is world-space text legible at VR resolution?
- Does the timing and tweening feel natural?
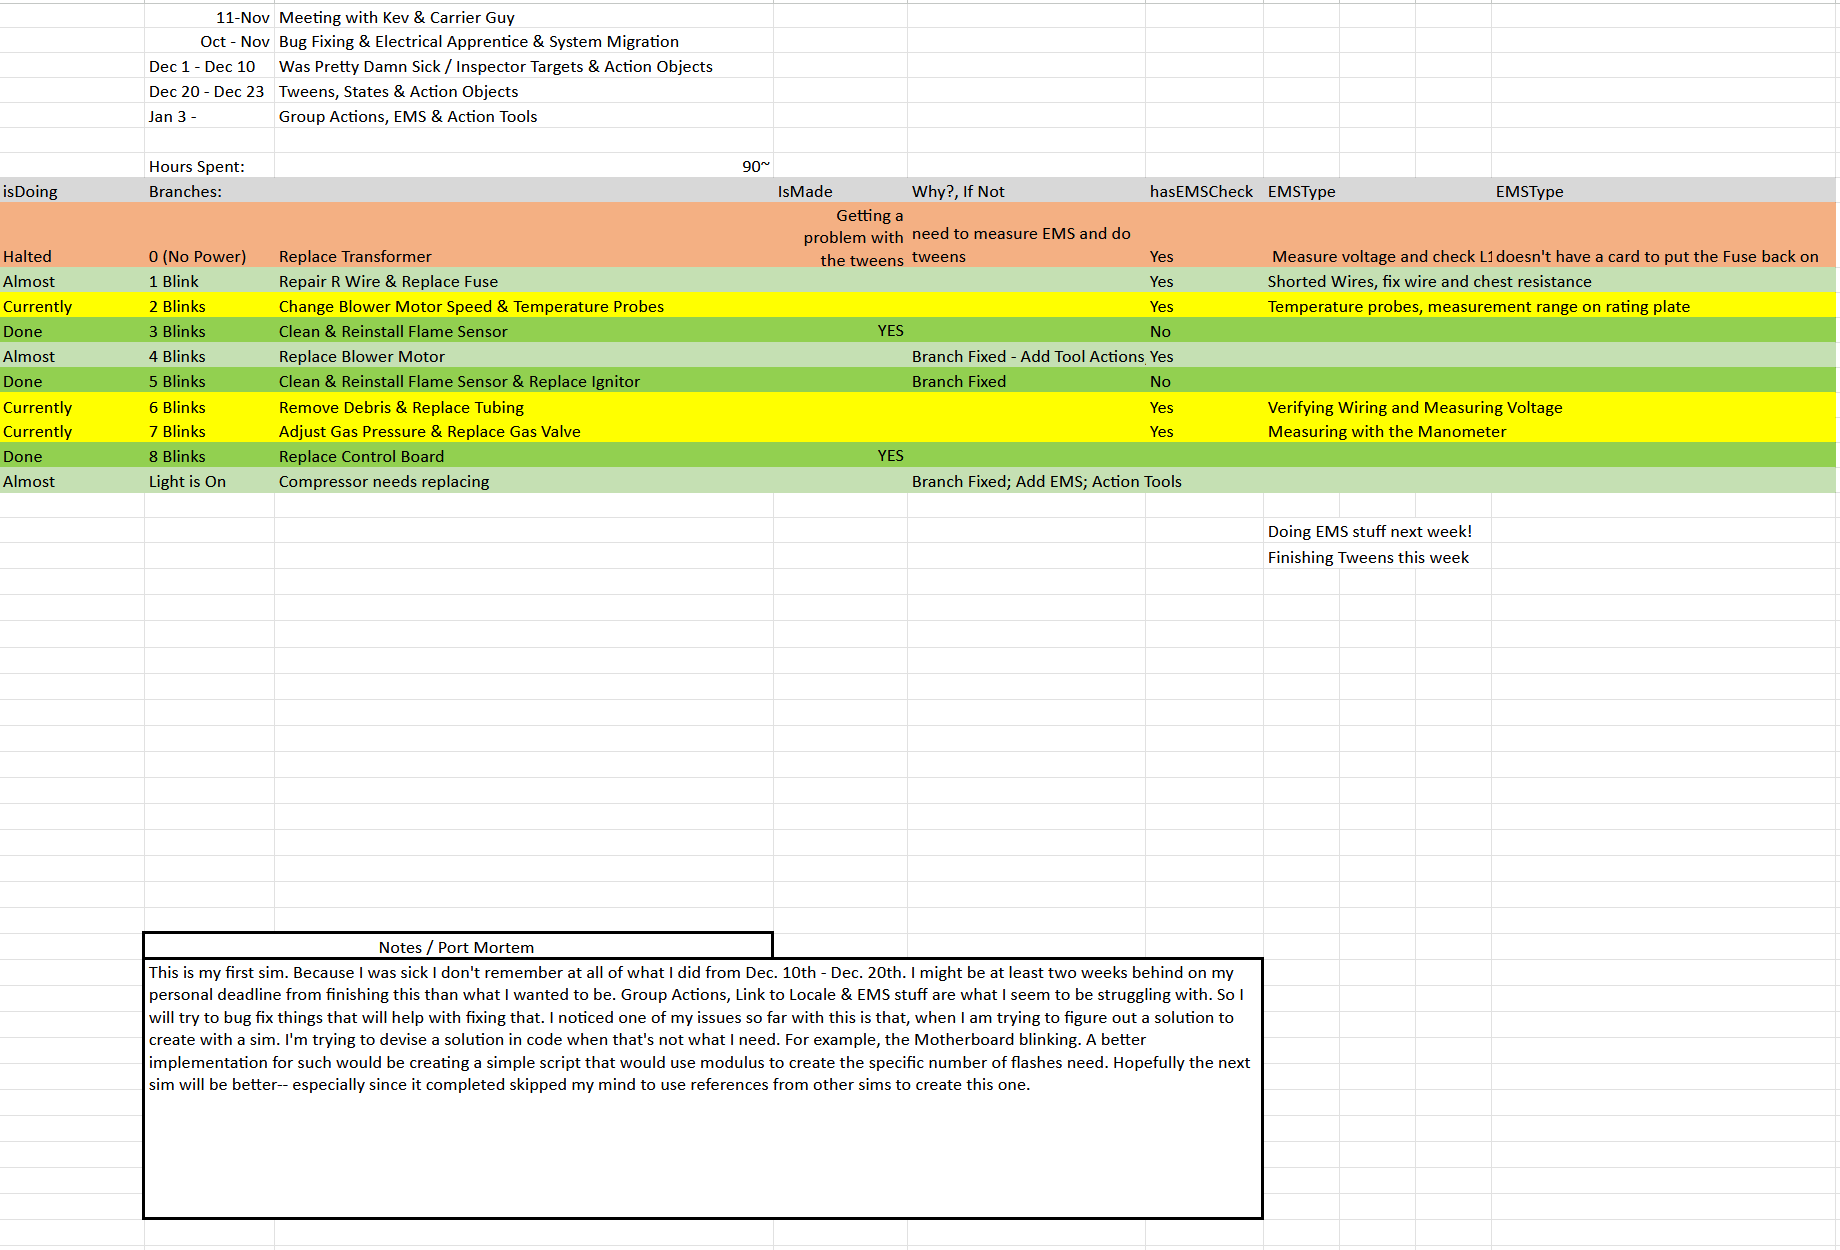
The Troubleshooting Matrix
SPP diagnostics relied on blink logic mapped to failure states. My internal tracking matrix:
| Blink Count | Fault |
|---|---|
| 0 (No Power) | Faulty Transformer |
| 1 Blink | Low Voltage Short |
| 2 Blinks | Temp Rise Out of Range |
| 3 Blinks | Dirty Flame Sensor |
| 4 Blinks | Faulty Blower Motor |
| 5 Blinks | Bad Ignitor |
| 6 Blinks | Pressure Switch Hose Blocker |
| 7 Blinks | Bad Gas Valve |
| 8 Blinks | Bad Control Board |
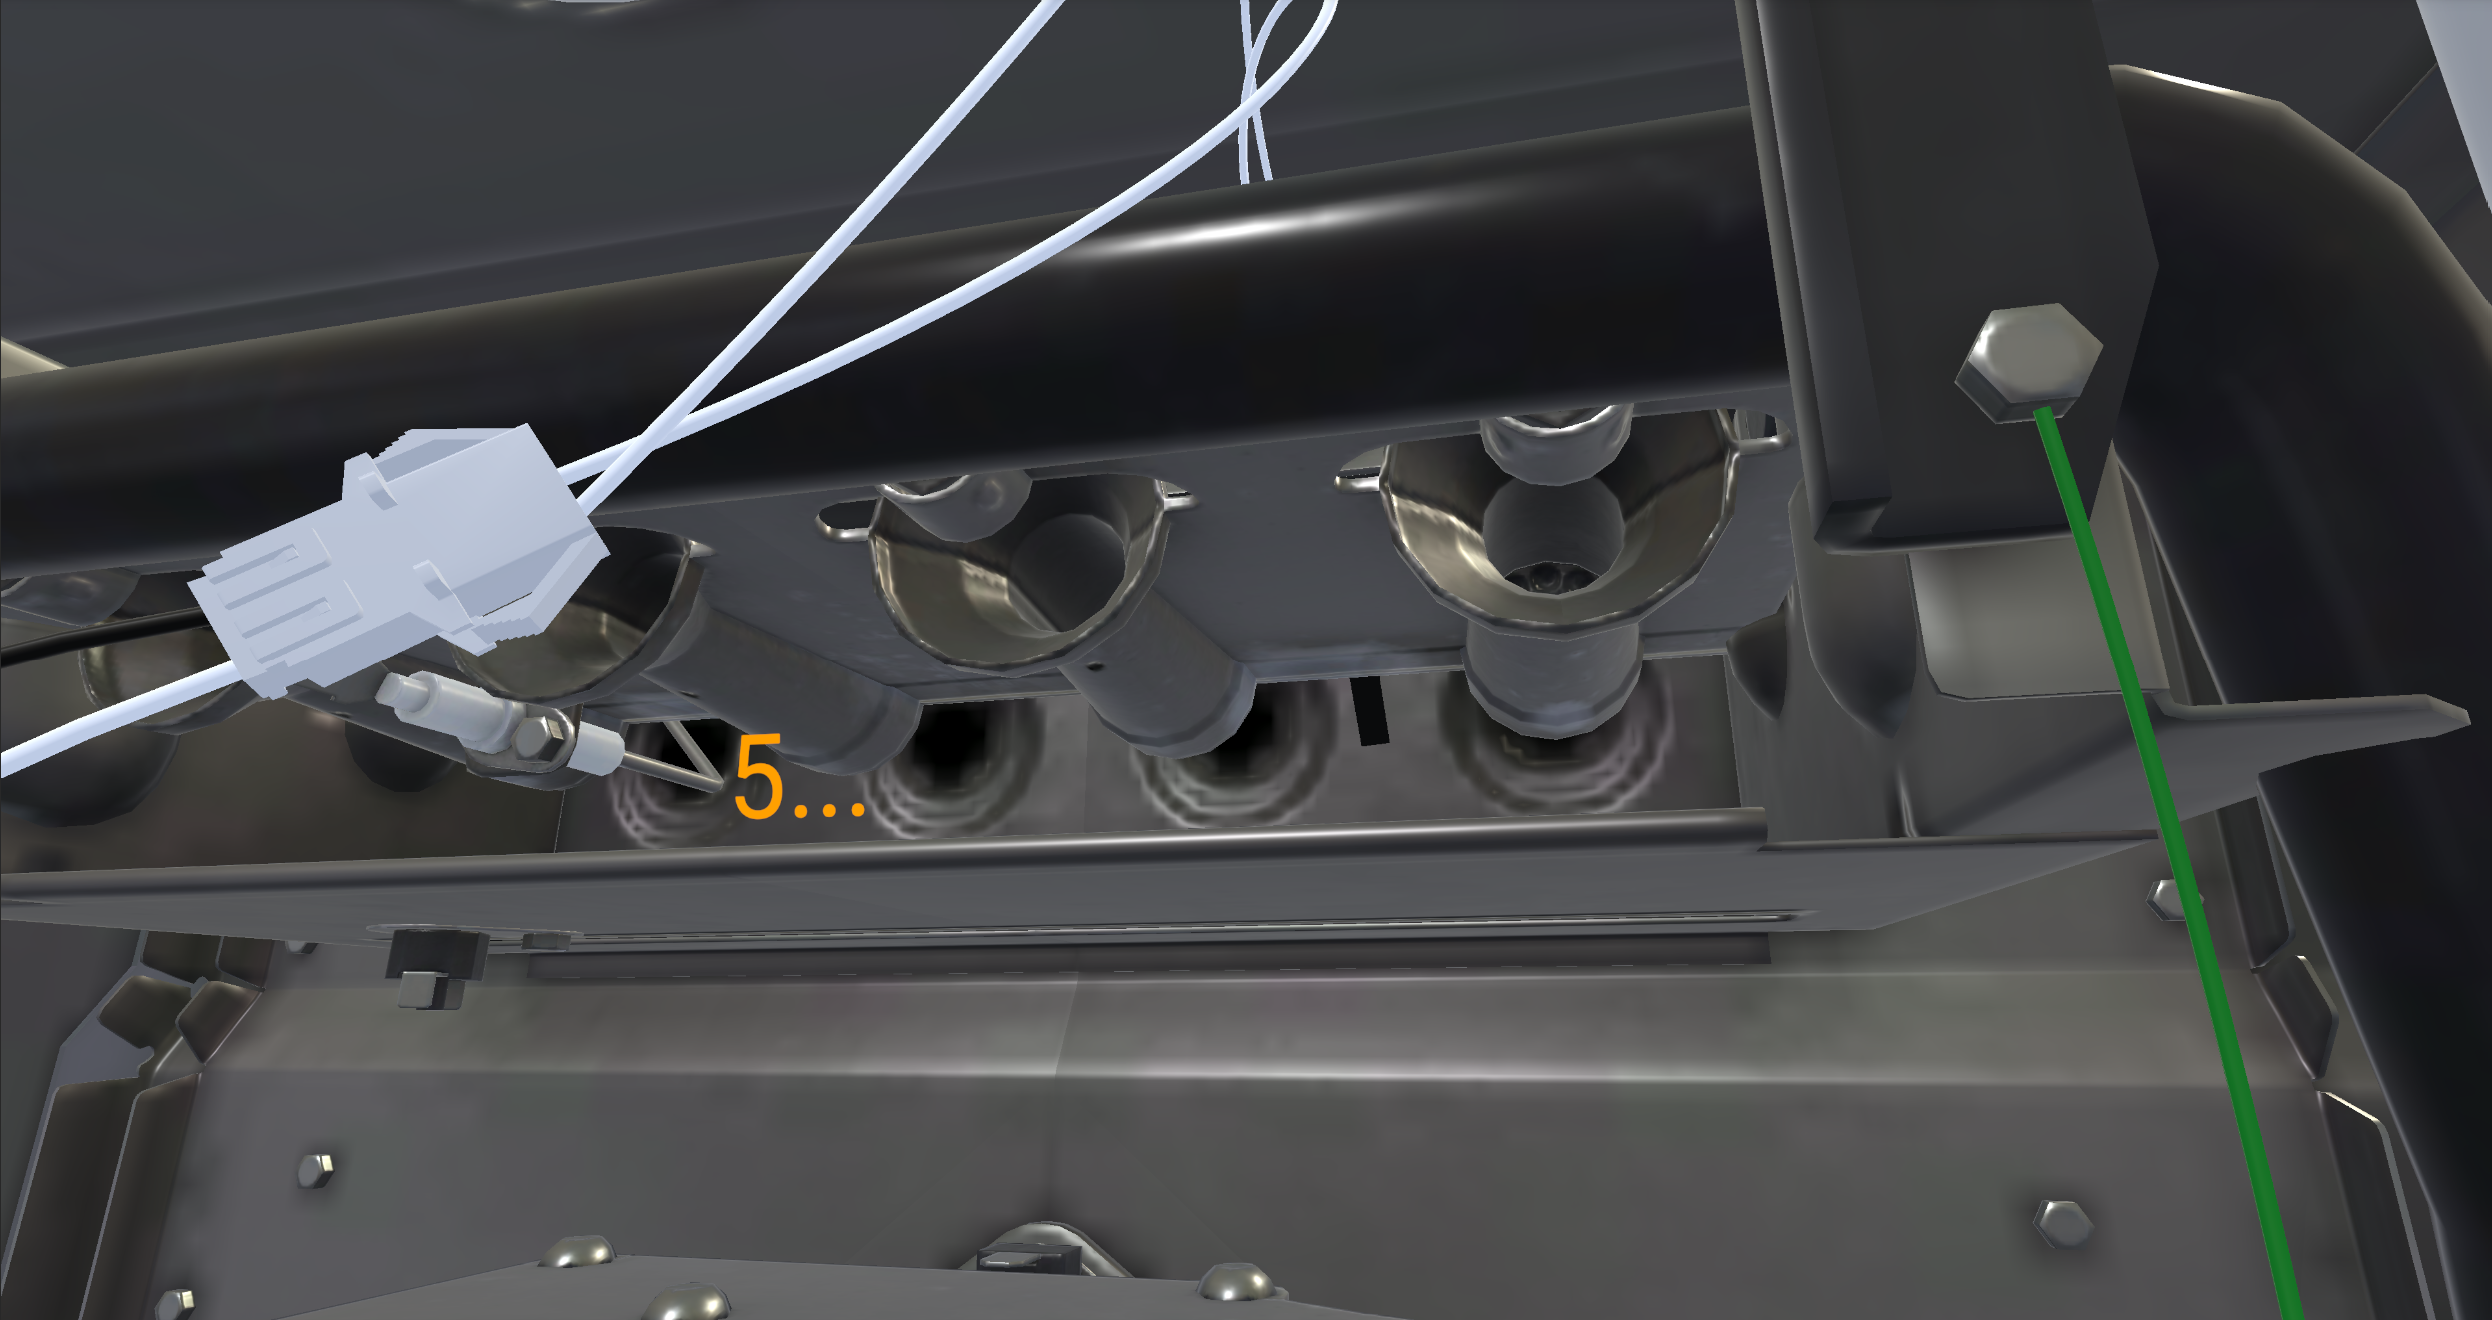
Simulated ignition fault in the VR app:
Control board interactions and error readouts:
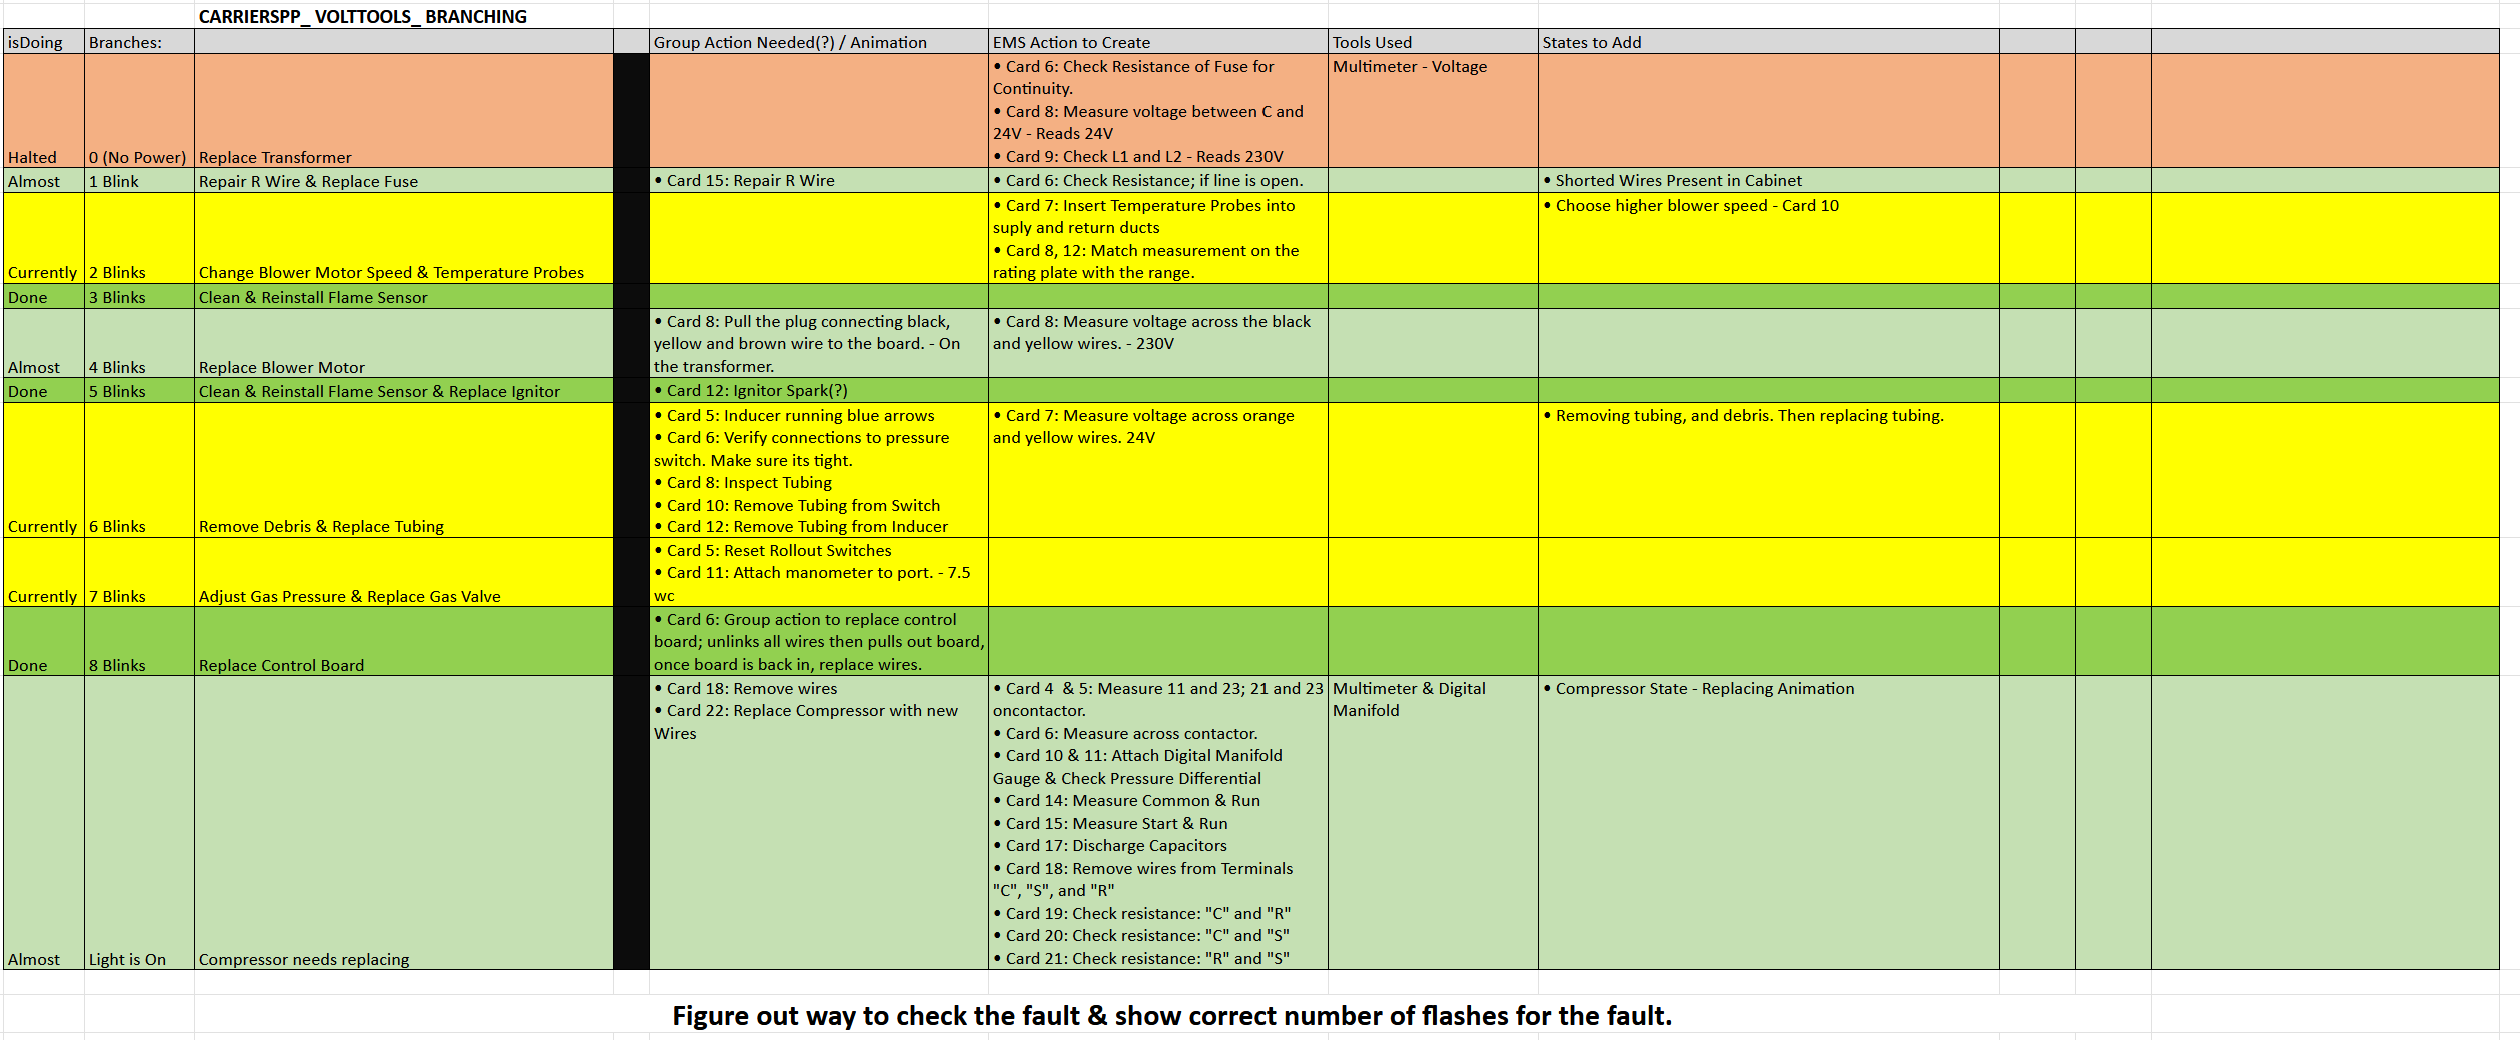
Production Tracking
My internal Carrier SPP Volt Tools Branching Spreadsheet:
Custom Tooling: In-Engine Documentation
The platform had no built-in way to leave notes on GameObjects for this kind of branching diagnostic work. So I built my own editor extension to attach commentary directly to components in the Unity Inspector:
using System.Collections;
using UnityEditor;
using UnityEngine;

namespace InspectorCommentary {
    [CustomEditor(typeof(Commentary))]
    public class ComEditor : Editor {
        private Commentary script { get { return target as Commentary; } }
        private GUIStyle style = new GUIStyle();

        private static Color color = new Color(0.2f, 0.3f, 0.1f, 1f);

        public override void OnInspectorGUI() {
            if (serializedObject == null) return;

            style.wordWrap = true;
            style.normal.textColor = EditorGUIUtility.color;

            serializedObject.Update();
            EditorGUILayout.Space();

            string text = EditorGUILayout.TextArea(script.text, style);
            if (text != script.text) {
                Undo.RecordObject(script, "Add Commentary");
                script.text = text;
            }

            EditorGUILayout.Space();
            serializedObject.ApplyModifiedProperties();
        }
    }
}
Some of my production notes were as blunt as the work itself:
Step 24 -> Automatically go from Save Cod to IDL
No more blower sounds when thermostat is now set to off
Inducer AO -> Running -> 360 Tween
Create Thermostat Wire R Terminal on control tween off / on
Fix Probe Tool Position
Step 17 - 18: Highlight & Remove Blower Cabinet
Step 29 - Reset Correct Answer / Stops At Step 29s | DONE
That is the texture of the work: specific, mechanical, scenario-bound problems solved one by one until the sim functioned exactly as intended.